Why & How I started this Blog
I always felt that there should be a place for me to post stuff which can be systematically accessed from anywhere. I read a lot of things and sometimes, I find them interesting & would like to remember them or make a note of some stuff. I used to make notes in word or some other editor, but I felt, I also need to share this information with a community which I care about. Someone might find this information useful. Initially I started a blog using content management system like WordPress which was very good, I mean, there are multiple plugins, very sophisticated indeed.
However, I was not posting any content for sometime. I felt opening the editor of WordPress, using the tags , etc… was too much of a hassle for me. I am not a professional content writer. I wanted something simple. more like I take my notes when I am studying and the content should automatically get posted to the website. I don’t even want people to have the ability to make comments on the site or anything. Just a simple static website. I am sure, there are tools out there that can do this for the WordPress but I figured out with some googling that something like this can exactly be done in the way I wanted using few tools/scripts. I am going to write down here how I built my blog for 2 reasons,
- Anyone else who would like something similar can follow along and set this up easily
- Another reason, that I won’t forget it easily once I write down. Also, I can come here anytime here & read too.
Now, Lets talk about how we are going to do that. here are the list of things you will need.
- Obsidian : Obsidian is a note taking tool just like notepad or notepad++ but it is much better than those.
- Hugo: Hugo is a tool that kind of acts like a webserver, but it converts the text files we have into HTML.
- GIT: Then, we take our website & push it to GitHub.
- Webhosting : We are going to create Webhook to push the code automatically to the hosting provider. In this case, i am using Hostinger as web hosing provider, technically, you can use any other provider.
First, download Obsidianfrom here. It is available for both Windows, Mac & Linux
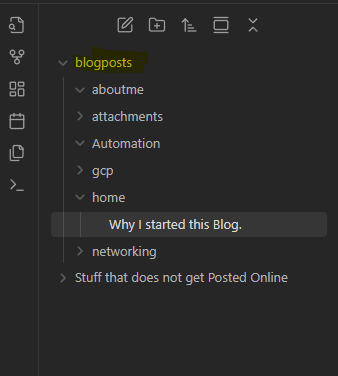
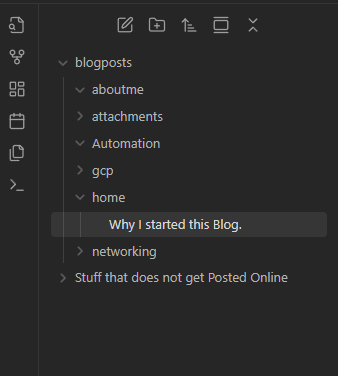
In Obsidian, we will create a new folder named “blogposts”. You can name is anything you want, You will have to reference this folder path later. it is important to note that anything under this folder or its subfolders will get pushed to the site. Here, If there is some stuff I don’t wish to post to the site. That goes into the other folder.
! Once you have Obsidian installed, you would need to install Hugo. but before you install Hugo, there are few pre-requisites, you need to install GIT (Code Repository) & GO programming language. Both are available on all platforms & can be installed easily by following the instructions in the link. Once you install you can check in the PowerShell/Terminal the currently installed version & you should see something like below.
!
Once you have Obsidian installed, you would need to install Hugo. but before you install Hugo, there are few pre-requisites, you need to install GIT (Code Repository) & GO programming language. Both are available on all platforms & can be installed easily by following the instructions in the link. Once you install you can check in the PowerShell/Terminal the currently installed version & you should see something like below.
!
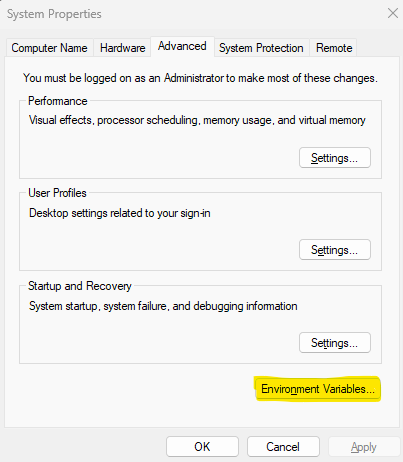
You can now install Hugo. Just follow the instructions provided in the link & you should be good. On Mac you can install it using brew, on windows, which is the current platform I am in, download the hugo.exe file, place it in your “C” drive & update your environment variables to add the path of Hugo folder you just created.
!
Once you do the above. You should be able to validate that Hugo is successfully installed by using hugo version in PowerShell.
Now, In PowerShell or Terminal, Navigate to folder where you want to store your website files & give the command hugo new site <sitename> in my case, the site name is ethernetdude. That will create a folder with the site name. let us check what’s inside the folder.
!
Now, let us setup GIT’s local empty repository. these needs to entered from Hugo home directory. This is going to tell GitHub who is making those changes to the blog.
git init
git config --global user.name "Your Name"
git config --global user.email "your.email@example.com"
Now, you have to choose a theme for Hugo. You can click here to visit the page & choose a theme of your choice. The theme I choose for this site is Terminal, because it is very simple. Different themes might have slightly different method of installing them but usually the themes include the steps to install them.
For Terminal, the installation I preferred was using the sub module. Just copy the below & paste in PowerShell/ Terminal.
git submodule add -f https://github.com/panr/hugo-theme-terminal.git themes/terminal
Now, we need to make sure that, the configuration file matches our theme. the configuration file I am talking about here is ==hugo.toml==. The Terminal theme has a base configuration file that you can use. copy the entire thing from the theme website & using notepad or vi editor open hugo.toml site & paste it. You can add some small modifications as well according your preferences.
!
Once done, you can check how the site runs locally. Now you can check the site theme using the localhost:1313 option. but it doesn’t have any content yet.
hugo server -t terminal
So, We have Obsidian, where we have our files on blogposts & inside Hugo we have a folder called ethernetdude which has content & inside which we have to create other folders. for the sake of my site, I am going to create folders listed below. but the default is called posts. if you don’t want multiple folders, just make a folder called posts.
!
Now, We have to find a way to sync the contents of our Obsidian folder to our Hugo folder.
In my case, I have sync D:\ethernetdude\Posts\blogposts to C:\Users\kapil\Documents\ethernetdude\content>. We can use robocopy on windows or rsync on mac to achieve this.
Windows:
robocopy {source path} {destination path} /mir
MAC: rsync -av –delete “source path” “destination path”
Once you successfully run your robocopy, you should can now run the Hugo server -t terminal & see the blog running locally with the content. You should see that the Obsidian Markdown files are converted to HTML by Hugo. At this point, if you are not seeing that work, you should stop & troubleshoot the issue before proceeding further.
However, you will notice, that the images in your obsidian document are not reflecting correctly in your webpage. The reason for this is Obsidian will save your images in a different folder. So to fix this issue using the python script.
First, figure out the path to where Obsidian is saving those images. it can been seen in the below screenshot. In my case, I am saving the attachments in a folder called attachments under the blogpost folder.
!
Now navigate to the Hugo Directory, under the Hugo folder, navigate to the static folder & create a directory called images in it.
Navigate to the Hugo home folder, create a file called images.py & use the below script. once done. run the code using python3 images.py command.
Windows:
import os
import re
import shutil
from pathlib import Path
# === CONFIGURATION ===
# Paths to your Obsidian posts and attachments
posts_dir = Path("D:/ethernetdude/Posts/blogposts") # Obsidian vault
attachments_dir = posts_dir / "attachments" # Folder containing images
# Paths for your Hugo site
hugo_content_dir = Path("C:/Users/kapil/Documents/ethernetdude/content") # Hugo content folder
static_images_dir = Path("C:/Users/kapil/Documents/ethernetdude/static/images") # Hugo static images folder
# Create directories if they don't exist
hugo_content_dir.mkdir(parents=True, exist_ok=True)
static_images_dir.mkdir(parents=True, exist_ok=True)
# === MAIN PROCESSING ===
for root, dirs, files in os.walk(posts_dir):
for filename in files:
if filename.endswith(".md"):
original_path = Path(root) / filename
# Compute the relative path for the destination folder
relative_path = original_path.relative_to(posts_dir)
destination_path = hugo_content_dir / relative_path
# Ensure the subdirectory exists in the destination
destination_path.parent.mkdir(parents=True, exist_ok=True)
# Read the content of the .md file
with original_path.open("r", encoding="utf-8") as f:
content = f.read()
# Find all images in the Obsidian format 
images = re.findall(r'\[\[([^]]*\.(?:png|jpg|jpeg|webp|gif|bmp|svg))\]\]', content, re.IGNORECASE)
# Process each image
for image in images:
# Convert the Obsidian image link format to Hugo format
markdown_image = f"})"
content = content.replace(f"[[{image}]]", markdown_image)
image_source = attachments_dir / image
image_target = static_images_dir / image
# Print out the image being processed for better debugging
print(f"Processing image: {image}")
# Check if the image exists in the attachments folder
if image_source.exists():
# Copy the image to the static/images folder if it doesn't already exist there
if not image_target.exists():
shutil.copy(image_source, image_target)
print(f"✅ Copied image: {image}")
else:
print(f"🟡 Image already exists: {image}")
else:
# Report if the image doesn't exist
print(f"❌ Missing image: {image_source}")
# Write the modified content back to the destination folder
with destination_path.open("w", encoding="utf-8") as f:
f.write(content)
print("✅ All Markdown files processed and images copied.")
MAC:
import os
import re
import shutil
from pathlib import Path
# === CONFIGURATION ===
# Obsidian vault location
posts_dir = Path("/Users/kapil/ethernetdude/Posts/blogposts") # Change this path on your Mac
attachments_dir = posts_dir / "attachments"
# Hugo site location
hugo_content_dir = Path("/Users/kapil/Documents/ethernetdude/content")
static_images_dir = Path("/Users/kapil/Documents/ethernetdude/static/images")
# Create output directories if they don't exist
hugo_content_dir.mkdir(parents=True, exist_ok=True)
static_images_dir.mkdir(parents=True, exist_ok=True)
# Track missing images for reporting
missing_images = []
# Display available images
print("🗂️ Attachments folder contains:")
for f in os.listdir(attachments_dir):
print(" -", f)
# === PROCESS MARKDOWN FILES ===
for root, dirs, files in os.walk(posts_dir):
for filename in files:
if filename.endswith(".md"):
original_path = Path(root) / filename
relative_path = original_path.relative_to(posts_dir)
destination_path = hugo_content_dir / relative_path
# Ensure subfolders exist at destination
destination_path.parent.mkdir(parents=True, exist_ok=True)
with original_path.open("r", encoding="utf-8") as f:
content = f.read()
# Find image links like 
images = re.findall(r'\[\[([^]]*\.(?:png|jpg|jpeg|webp|gif|bmp|svg))\]\]', content, re.IGNORECASE)
for image in images:
print(f"🔍 Processing image: {image} in file {original_path.name}")
markdown_image = f"})"
content = content.replace(f"[[{image}]]", markdown_image)
image_target = static_images_dir / image
# Case-insensitive search in attachments folder
image_found = False
for file in os.listdir(attachments_dir):
print(f" Comparing with: {file}")
if file.lower() == image.lower():
image_source = attachments_dir / file
image_found = True
break
if image_found:
if not image_target.exists():
shutil.copy(image_source, image_target)
print(f"✅ Copied image: {image}")
else:
print(f"🟡 Already exists: {image}")
else:
missing_images.append(f"{image} (in file: {original_path})")
print(f"❌ Missing image: {image} (referenced in {original_path})")
# Save modified Markdown
with destination_path.open("w", encoding="utf-8") as f:
f.write(content)
# === SUMMARY ===
if missing_images:
print("\n🚨 Missing image references:")
for entry in missing_images:
print(f" - {entry}")
else:
print("\n✅ All images found and Markdown files processed.")
print("\n🎉 Done.")
The Script should run correctly, if your directories are set correctly. You should set the posts directory, attachments directory & static images folder you created in Hugo home folder correctly. Once the script runs successfully, you should see that the images from your Obsidian are getting copied to the images folder you created under static folder. Now, back to your terminal, run the Hugo server locally again & see if the images are getting formatted properly.
So, at this point, you have obsidian, pushing the code to Hugo and the website is working fine. Now, we need to push our site to GitHub.
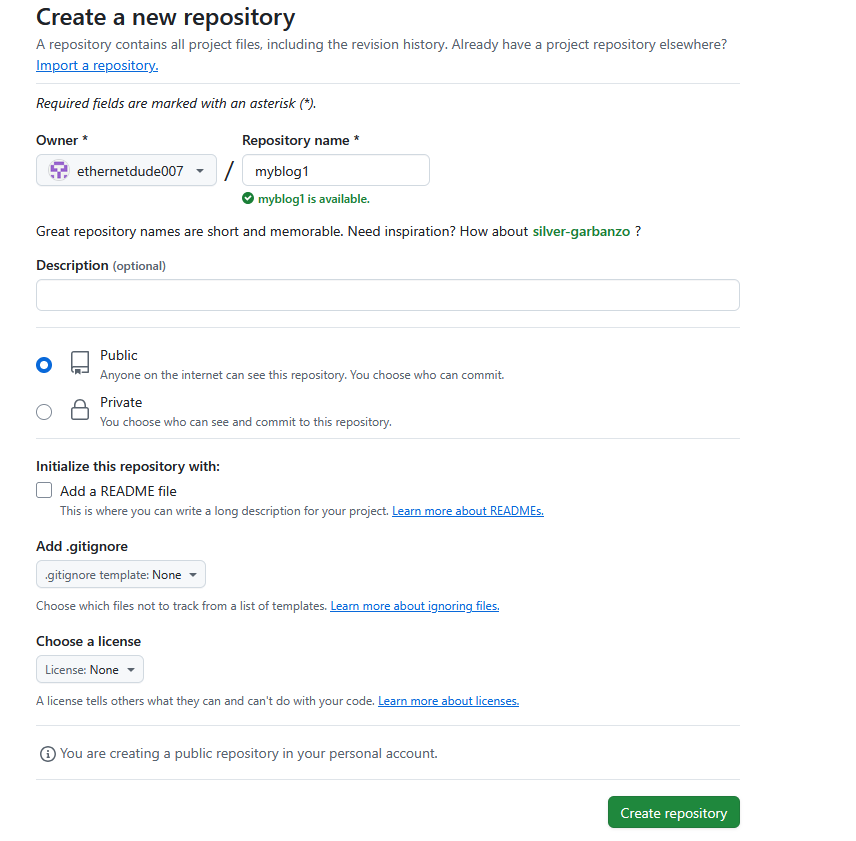
Login to GitHub & click new & create a new repository. You can name it whatever you want, I am just calling mine as “myblog”. You can choose to make your repository either public or private. I will just leave mine to public.
!
Now, our GitHub is setup, Now our goal is to take all the code in our Hugo folder & push that to the GitHub repository. to do that we need to authenticate, for that we will use an SSH Key. You will usually find your SSH key in the directory cd ~/.ssh. In my case, I already have a SSH key present. The .pub is the public key we will upload this to GitHub.
!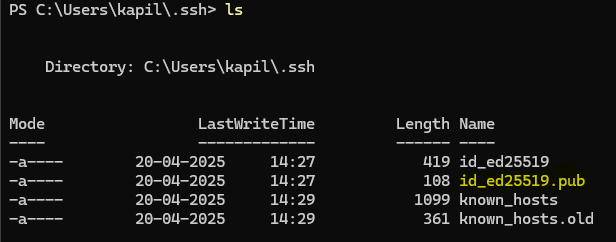 If you don’t have a SSH Key, you can generate it using the below command.
ssh-keygen -t rsa -b 4096 -C "Your Email Address"
Now, using the cat command, take a look at the contents of the key & copy them. Navigate to GitHub & go to Settings –> SSH & GPG keys. Now, add the key
Now, to make sure you can authenticate by using the command ssh -t git@github.com. if successful, you will get a message like this.
Now, we need to add the remote GitHub repository & this can be done using the below commands
git remote add origin1 git@github.com:ethernetdude007/myblog.git
hugo
git add .
git commit -m "my first commit"
git push -u origin1 master
Now, if you go to GitHub & check the repository, you will all the files in Hugo directory pushed to it.
!
Now, there is one last thing, we need to do. We are going to Host our website on Hostinger & Hostinger does not need all the files, it only cares about the public folder.
So, we are seeing all these files on the Master branch of GitHub. We are going to post the Public folder to it’s own GitHub branch. This is called as creating a Git subtree, but for now, just know that you can use the below lines of code.
git subtree split --prefix public -b hostinger-deploy
git push origin1 hostinger-deploy:hostinger --force
git branch -D hostinger-deploy
Once this is applied, we should see a new branch appear in our GitHub repository.
!
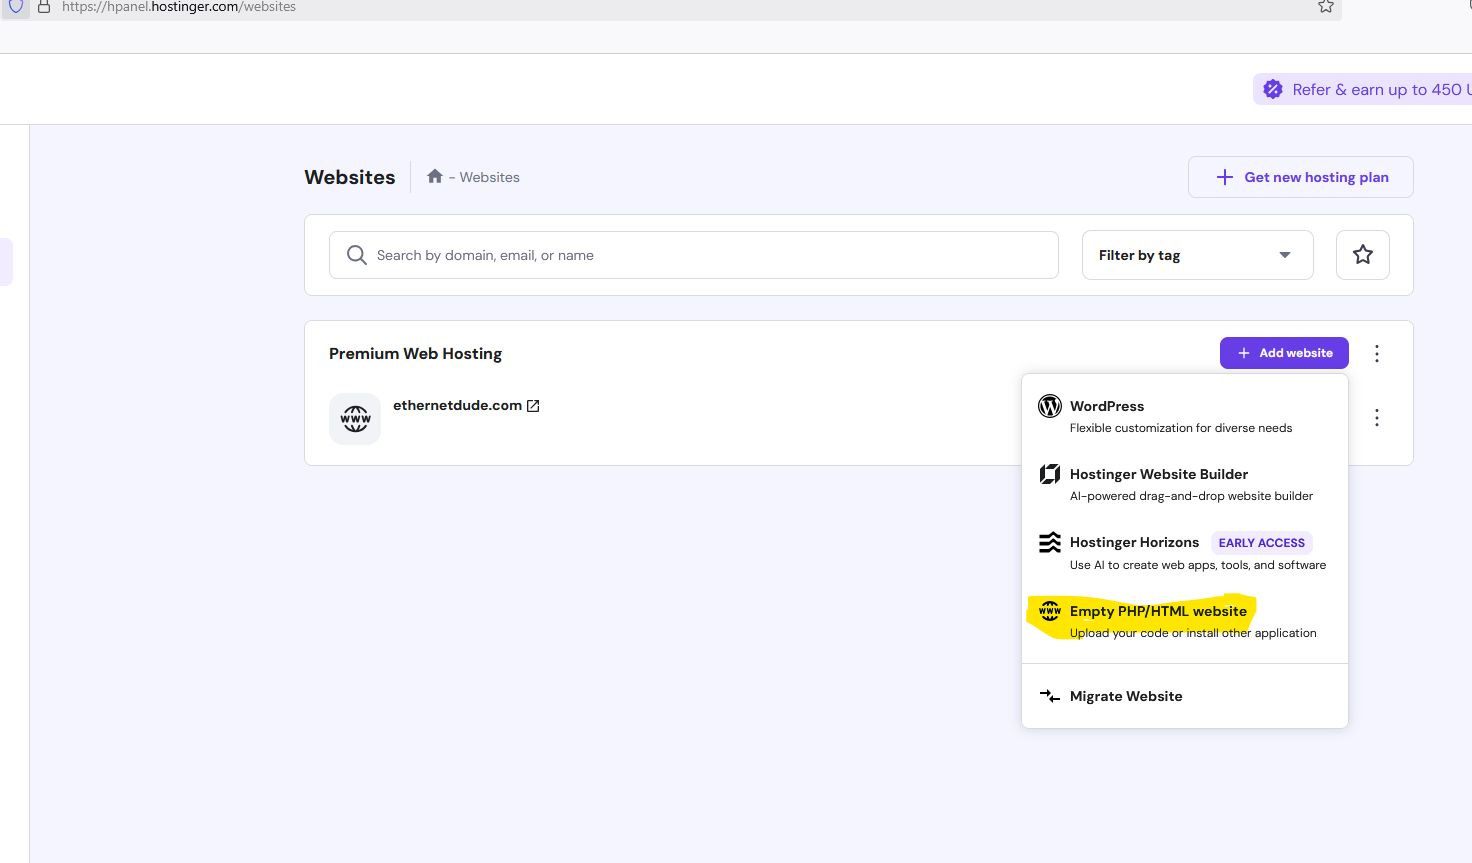
Now, GitHub is done, we need to finally push our code to Hostinger. Login to Hostinger & click on add a new website. We are going to create an Empty site.
!
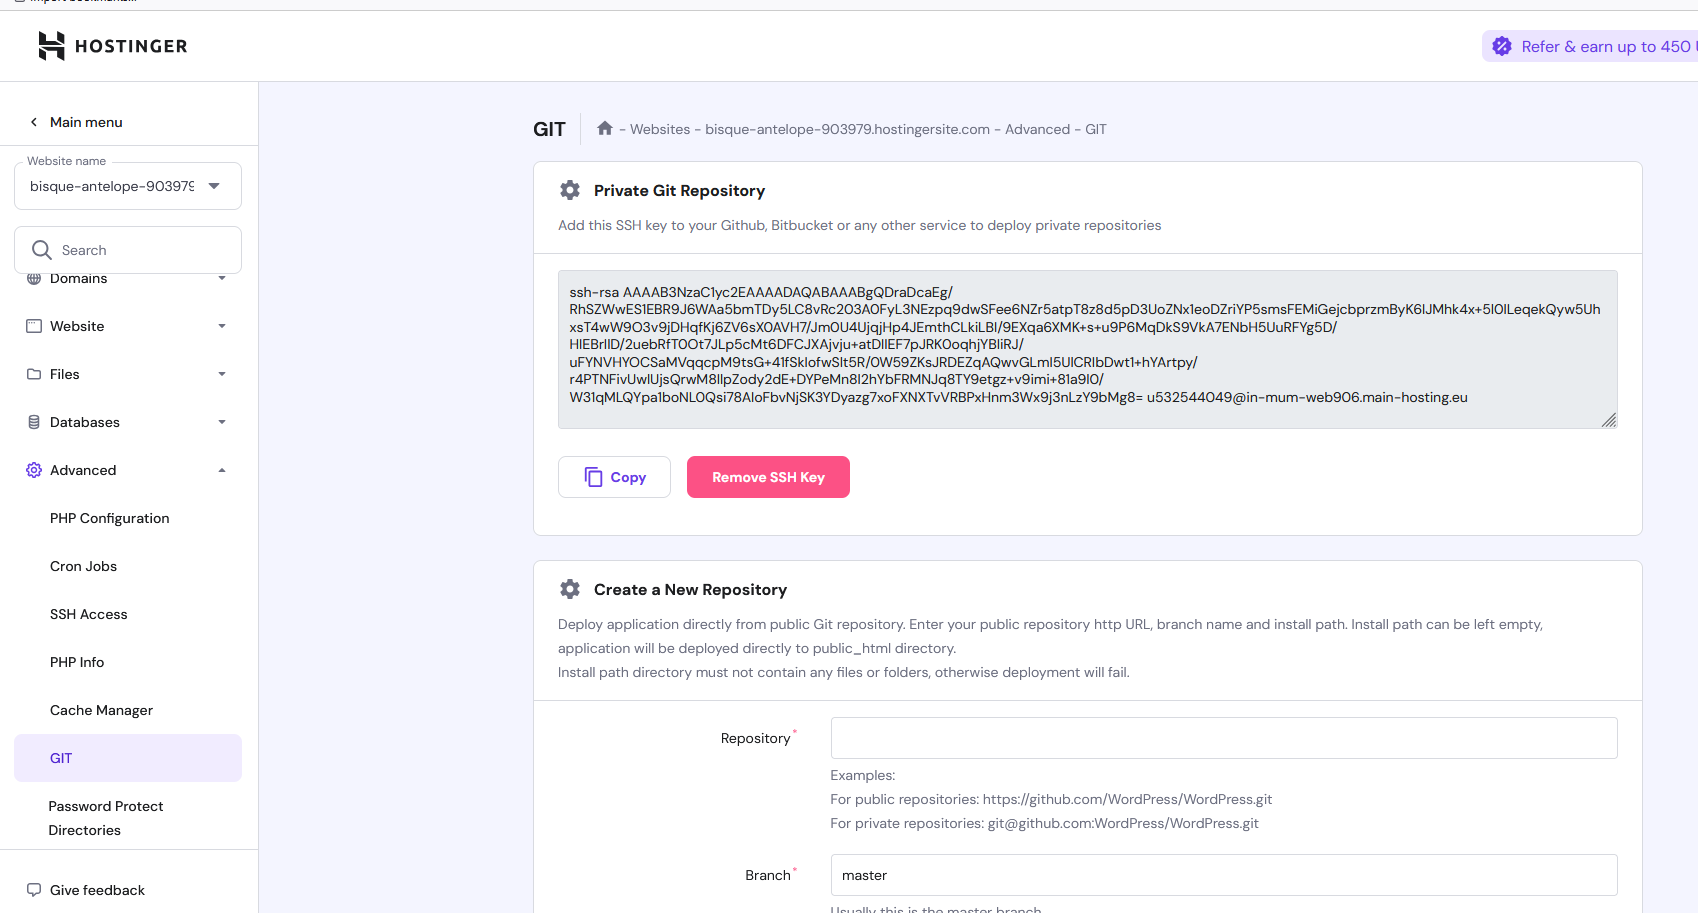
Once an Empty site is create, go to Advanced –> GIT & generate an SSH key.
!
Copy the generated SSH Key & paste it in GitHub under settings –> SSH & GPG Keys and add new key just like we did in the previous step. update hostinger the repository name & the branch to the “hostinger” branch we created earlier. Now, we don’t want to come here & deploy the site every time we post something. we are going to do an auto deployment process. for that click on the Auto deploy option.
!
Copy the webhook url from there & click on the link which says setup webhook on GitHub.
!
Paste the Webhook URL you copied on the Payload URL tab & click on Add Webhook.
Now, what this does is GitHub, will send an update to Hostinger when ever there is a new code. However, you will need to do the following.
- use Robocopy or Rsync to copy our files.
- use our Python script to copy the images.
- use the hugo command for the site to be built
- Then we have to do our Git commands
The above, is still a lot of work. it is hard to do all these every time we add/modify some content to our blog. The below is the Script that does every single thing, we did so far. There are 2 different versions one for windows & one for Mac. You need to ensure that the Variable are updated correctly as per your folders path & also update the repo name.
# PowerShell Script for Windows

# Set variables for Obsidian to Hugo copy
$sourcePath = "C:\Users\path\to\obsidian\posts"
$destinationPath = "C:\Users\path\to\hugo\posts"

# Set Github repo
$myrepo = "reponame"

# Set error handling
$ErrorActionPreference = "Stop"
Set-StrictMode -Version Latest

# Change to the script's directory
$ScriptDir = Split-Path -Parent $MyInvocation.MyCommand.Definition
Set-Location $ScriptDir

# Check for required commands
$requiredCommands = @('git', 'hugo')

# Check for Python command (python or python3)
if (Get-Command 'python' -ErrorAction SilentlyContinue) {
    $pythonCommand = 'python'
} elseif (Get-Command 'python3' -ErrorAction SilentlyContinue) {
    $pythonCommand = 'python3'
} else {
    Write-Error "Python is not installed or not in PATH."
    exit 1
}

foreach ($cmd in $requiredCommands) {
    if (-not (Get-Command $cmd -ErrorAction SilentlyContinue)) {
        Write-Error "$cmd is not installed or not in PATH."
        exit 1
    }
}

# Step 1: Check if Git is initialized, and initialize if necessary
if (-not (Test-Path ".git")) {
    Write-Host "Initializing Git repository..."
    git init
    git remote add origin $myrepo
} else {
    Write-Host "Git repository already initialized."
    $remotes = git remote
    if (-not ($remotes -contains 'origin')) {
        Write-Host "Adding remote origin..."
        git remote add origin $myrepo
    }
}

# Step 2: Sync posts from Obsidian to Hugo content folder using Robocopy
Write-Host "Syncing posts from Obsidian..."

if (-not (Test-Path $sourcePath)) {
    Write-Error "Source path does not exist: $sourcePath"
    exit 1
}

if (-not (Test-Path $destinationPath)) {
    Write-Error "Destination path does not exist: $destinationPath"
    exit 1
}

# Use Robocopy to mirror the directories
$robocopyOptions = @('/MIR', '/Z', '/W:5', '/R:3')
$robocopyResult = robocopy $sourcePath $destinationPath @robocopyOptions

if ($LASTEXITCODE -ge 8) {
    Write-Error "Robocopy failed with exit code $LASTEXITCODE"
    exit 1
}

# Step 3: Process Markdown files with Python script to handle image links
Write-Host "Processing image links in Markdown files..."
if (-not (Test-Path "images.py")) {
    Write-Error "Python script images.py not found."
    exit 1
}

# Execute the Python script
try {
    & $pythonCommand images.py
} catch {
    Write-Error "Failed to process image links."
    exit 1
}

# Step 4: Build the Hugo site
Write-Host "Building the Hugo site..."
try {
    hugo
} catch {
    Write-Error "Hugo build failed."
    exit 1
}

# Step 5: Add changes to Git
Write-Host "Staging changes for Git..."
$hasChanges = (git status --porcelain) -ne ""
if (-not $hasChanges) {
    Write-Host "No changes to stage."
} else {
    git add .
}

# Step 6: Commit changes with a dynamic message
$commitMessage = "New Blog Post on $(Get-Date -Format 'yyyy-MM-dd HH:mm:ss')"
$hasStagedChanges = (git diff --cached --name-only) -ne ""
if (-not $hasStagedChanges) {
    Write-Host "No changes to commit."
} else {
    Write-Host "Committing changes..."
    git commit -m "$commitMessage"
}

# Step 7: Push all changes to the main branch
Write-Host "Deploying to GitHub Master..."
try {
    git push origin master
} catch {
    Write-Error "Failed to push to Master branch."
    exit 1
}

# Step 8: Push the public folder to the hostinger branch using subtree split and force push
Write-Host "Deploying to GitHub Hostinger..."

# Check if the temporary branch exists and delete it
$branchExists = git branch --list "hostinger-deploy"
if ($branchExists) {
    git branch -D hostinger-deploy
}

# Perform subtree split
try {
    git subtree split --prefix public -b hostinger-deploy
} catch {
    Write-Error "Subtree split failed."
    exit 1
}

# Push to hostinger branch with force
try {
    git push origin hostinger-deploy:hostinger --force
} catch {
    Write-Error "Failed to push to hostinger branch."
    git branch -D hostinger-deploy
    exit 1
}

# Delete the temporary branch
git branch -D hostinger-deploy

Write-Host "All done! Site synced, processed, committed, built, and deployed."
MAC/Linux:
#!/bin/bash
set -euo pipefail

# Change to the script's directory
SCRIPT_DIR="$(cd "$(dirname "${BASH_SOURCE[0]}")" && pwd)"
cd "$SCRIPT_DIR"

# Set variables for Obsidian to Hugo copy
sourcePath="/Users/path/to/obsidian/posts"
destinationPath="/Users/path/to/hugo/posts"

# Set GitHub Repo
myrepo="reponame"

# Check for required commands
for cmd in git rsync python3 hugo; do
    if ! command -v $cmd &> /dev/null; then
        echo "$cmd is not installed or not in PATH."
        exit 1
    fi
done

# Step 1: Check if Git is initialized, and initialize if necessary
if [ ! -d ".git" ]; then
    echo "Initializing Git repository..."
    git init
    git remote add origin $myrepo
else
    echo "Git repository already initialized."
    if ! git remote | grep -q 'origin'; then
        echo "Adding remote origin..."
        git remote add origin $myrepo
    fi
fi

# Step 2: Sync posts from Obsidian to Hugo content folder using rsync
echo "Syncing posts from Obsidian..."

if [ ! -d "$sourcePath" ]; then
    echo "Source path does not exist: $sourcePath"
    exit 1
fi

if [ ! -d "$destinationPath" ]; then
    echo "Destination path does not exist: $destinationPath"
    exit 1
fi

rsync -av --delete "$sourcePath" "$destinationPath"

# Step 3: Process Markdown files with Python script to handle image links
echo "Processing image links in Markdown files..."
if [ ! -f "images.py" ]; then
    echo "Python script images.py not found."
    exit 1
fi

if ! python3 images.py; then
    echo "Failed to process image links."
    exit 1
fi

# Step 4: Build the Hugo site
echo "Building the Hugo site..."
if ! hugo; then
    echo "Hugo build failed."
    exit 1
fi

# Step 5: Add changes to Git
echo "Staging changes for Git..."
if git diff --quiet && git diff --cached --quiet; then
    echo "No changes to stage."
else
    git add .
fi

# Step 6: Commit changes with a dynamic message
commit_message="New Blog Post on $(date +'%Y-%m-%d %H:%M:%S')"
if git diff --cached --quiet; then
    echo "No changes to commit."
else
    echo "Committing changes..."
    git commit -m "$commit_message"
fi

# Step 7: Push all changes to the main branch
echo "Deploying to GitHub Main..."
if ! git push origin main; then
    echo "Failed to push to main branch."
    exit 1
fi

# Step 8: Push the public folder to the hostinger branch using subtree split and force push
echo "Deploying to GitHub Hostinger..."
if git branch --list | grep -q 'hostinger-deploy'; then
    git branch -D hostinger-deploy
fi

if ! git subtree split --prefix public -b hostinger-deploy; then
    echo "Subtree split failed."
    exit 1
fi

if ! git push origin hostinger-deploy:hostinger --force; then
    echo "Failed to push to hostinger branch."
    git branch -D hostinger-deploy
    exit 1
fi

git branch -D hostinger-deploy

echo "All done! Site synced, processed, committed, built, and deployed."
create a file using the above code in the same Hugo folder and the file extention will be .sh for Mac/Linux and .ps1 for windows.
So next time you update your obsidian notes or add a new note, all you need to do is run the script.
!