Instance groups are used to manage a group of instances as a single entity. You can manage similar virtual machines having similar life cycles as a single unit.
There are 2 types of instance group that you can create namely managed or unmanaged instance group.
- Managed instance groups
- unmanaged instance groups
Managed instance groups are usually set of identical virtual machines created using the same instance template. Some of the features that are provided for the managed instance groups are auto-scaling, managed releases & auto-healing.
- it can detect application failures based on health checks (self-healing)
- We can increase and decrease the instances based on the load ( Auto-Scaling)
- Add a load balancer to distrubute load.
- Release new application versions without downtime.
- Canary deployment & rolling updates is also supported with managed instance groups.
unmanaged instance groups are usually groups of virtual machines that have different hardware, different images etc… Unmanaged instance groups do not support auto-scaling, auto-healing and other services. Creating this kind of instance is usually not recommended.
Both unmanaged or managed instances can be zonal or regional. More information about instance groups can be found in this link
Creating a Managed Instance Group:
To create a Managed instance group, instance template is mandatory. We also have to define how we want to do auto-scaling & things like Minimum number of instances, Maximum number of instances, Auto scaling metrics (CPU utilization, load balancer utilization or any other metric from stack driver). You can also define cool down timers to avoid rapid increase or sudden drop of the instances number.
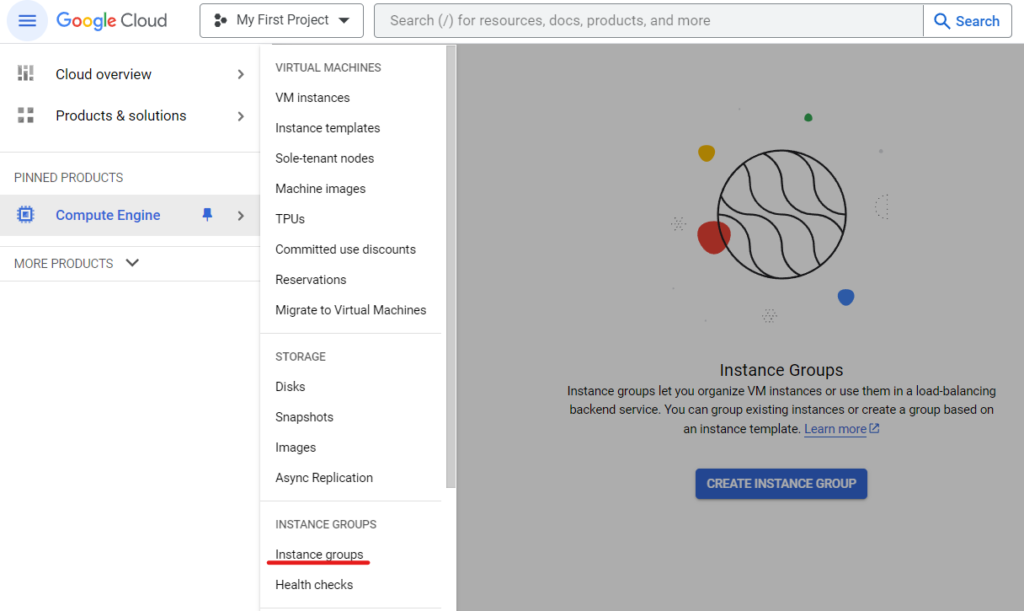
Now let us see how to create an Instance group practically. Navigate to the below path where you have an option to create an instance group.

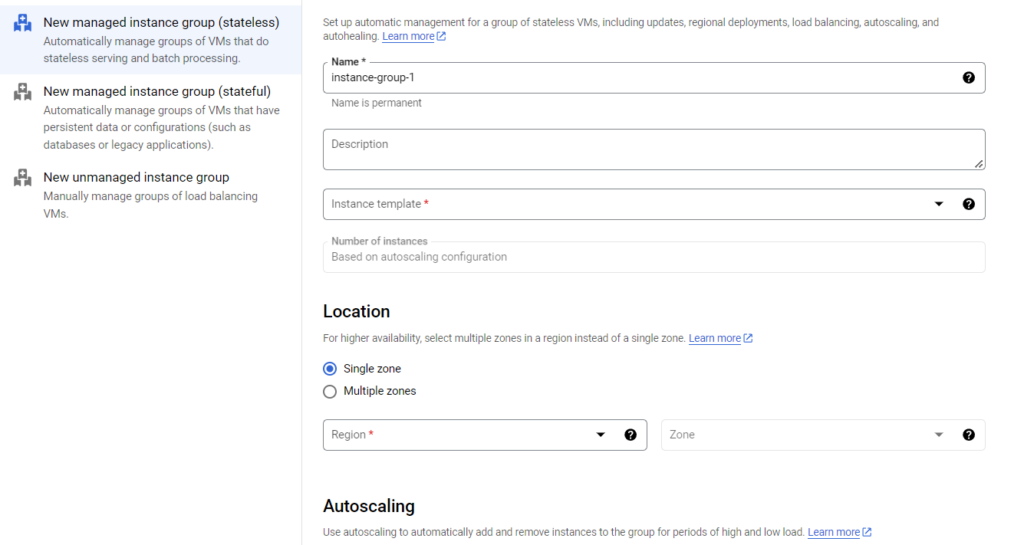
When you click on the create instance group option you are presented with the below options. As we discussed, you will see that there are managed and un-managed instance groups. But you will also notice there are 2 types in the managed instance groups & the explaination about them is present in the screenshot itself.
- Stateful managed instance group
- Stateless managed instance group

We have to specify a name for the instance group and also choose the template which we want to use and the location where we want to deploy the instances.

The auto-scaling options are also presented here. We can either choose to auto-scale or turn off auto-scaling.

Once we choose the auto-scaling method, we are then presented with other options like minimum number of instances and the maximum number of instances. The default auto scale method is CPU utilization, this can be customized as per your requirement.
You can also see in the below screenshot the option for scheduling auto-scaling. This is useful if you know that your instance is going to have more load during particular periods of time.

Auto-healing is configured based on a health check. The specified health check is performed on a periodic basis. The time frames are mentioned below in the screenshot for the health check.

Once the desired options are set, we can click create & this will start the creation of managed instance group. The creation of managed instance group will take few minutes and the new instances will be created based on the parameters set.

