The Limitations of Raw NodePorts in Cloud Environments
If you deploy your applications in a public cloud environment (such as AWS, GCP, or Azure) and expose them using NodePort services on high-range ports like 30008, you run into production limitations. You cannot easily ask external users to type high-range ports into their browsers. Customers expect standard HTTP/HTTPS access on port 80 or 443.
Additionally, exposing node IP addresses directly is a resilience risk. If a node fails, any client attempting to access that specific IP address will experience an outage, even if your application pods are running on other healthy hosts. You need a stable, cloud-native load balancer to manage incoming connections.
Automated Cloud Balancer Provisioning and Source IP Preservation
The LoadBalancer Service addresses this requirement. When you define a service type as LoadBalancer in a cloud environment, the cluster’s Cloud Controller Manager (CCM) automatically requests the cloud provider API to provision a native load balancer (such as an AWS NLB or GCP Load Balancer).
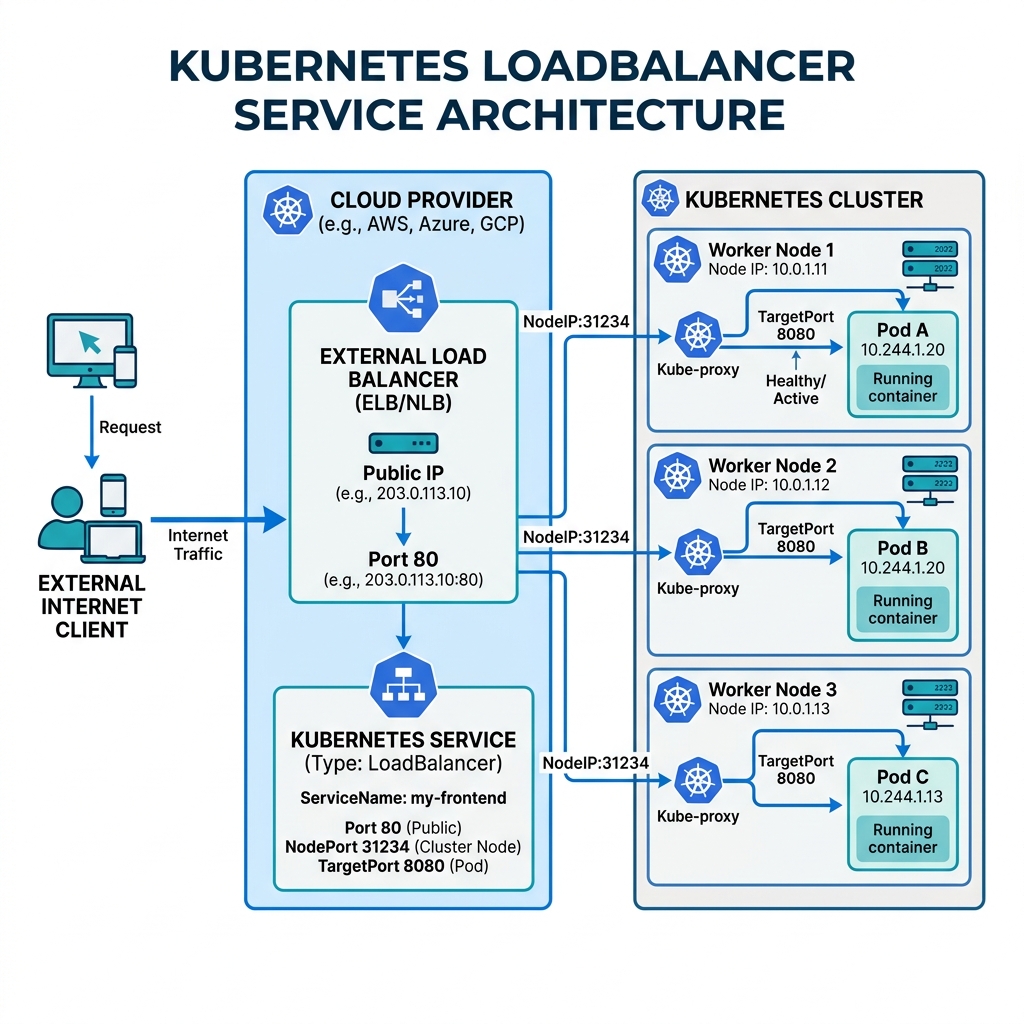
Under the hood, the LoadBalancer service acts as an extension of a NodePort service. The cloud provider configures an external load balancer with a public IP or DNS name. It then routes incoming traffic on port 80/443 to the cluster nodes on an auto-allocated high-range nodePort (e.g., 31245). Once traffic hits the nodes, Kube-proxy routes it to the active pods.
A critical configuration in production is externalTrafficPolicy:
* Cluster (Default): Traffic hitting a node is routed to any active pod in the cluster, even if the pod is on a different node. This can cause an extra network hop across nodes and obscures the client’s original source IP address (replacing it with the node’s internal CNI IP).
* Local: Traffic hitting a node is only routed to pods running on that specific node. This preserves the original client Source IP address and avoids extra network hops. If a node has no running pods for that service, the load balancer stops sending traffic to that node.
Here is how the cloud load balancer integrates with your cluster nodes:
Deploying a LoadBalancer Service
Let’s create a LoadBalancer service configuration. Save the following YAML configuration as web-lb-service.yaml:
apiVersion: v1
kind: Service
metadata:
  name: cloud-web-service
spec:
  type: LoadBalancer
  externalTrafficPolicy: Local  # Preserves client source IP address
  ports:
  - port: 80
    targetPort: 80
  selector:
    app: nginx-web
Apply the service configuration:
$ kubectl apply -f web-lb-service.yaml
service/cloud-web-service created
Check the service status:
$ kubectl get services
NAME                TYPE           CLUSTER-IP     EXTERNAL-IP                              PORT(S)        AGE
kubernetes          ClusterIP      10.96.0.1      <none>        443/TCP        12d
cloud-web-service   LoadBalancer   10.100.45.182  a123-out.elb.amazonaws.com               80:31245/TCP   30s
If you are running in a supported cloud environment, the EXTERNAL-IP field will populate with a public IP or DNS hostname. If you are running locally (e.g., on minikube), this field will show <pending> because there is no cloud provider API available to provision the physical hardware.
To simulate a cloud load balancer locally, run the minikube tunnel command in a separate terminal:
$ minikube tunnel
Once active, the tunnel routes traffic to a local IP address in the EXTERNAL-IP column:
$ kubectl get services cloud-web-service
NAME                TYPE           CLUSTER-IP     EXTERNAL-IP      PORT(S)        AGE
cloud-web-service   LoadBalancer   10.100.45.182  192.168.49.10    80:31245/TCP   2m
You can now visit http://192.168.49.10 in your browser to access your Nginx application directly on port 80, using a stable ingress path.