I remember the first time I configured PIM Dense Mode in a lab. I thought it would be the simple, straightforward option — no RP to deal with, no rendezvous point shenanigans, just “send traffic everywhere & let routers sort it out.” What I did not expect was watching my CPU utilization spike on every router in the topology every three minutes when the prune timers expired & the flood cycle started all over again. That is when I understood why PIM Dense Mode exists primarily as a teaching tool & a historical artifact of early multicast design.
But here is the thing — you need to understand Dense Mode to understand why Sparse Mode works the way it does. PIM-SM was designed as the answer to every problem PIM-DM created. So let us build it, watch it behave, & appreciate the chaos.
What You Will Need
| Component | Quantity | EVE-NG Image |
|---|---|---|
| Cisco IOSv Router (Network) | 4 | i86bi_Linux-L3-AdvEnterpriseK9-M2_157_3_May_2018.bin |
| Cisco IOSv Router (Source/Receiver) | 2 | i86bi_Linux-L3-AdvEnterpriseK9-M2_157_3_May_2018.bin |
Note: You can simulate the same in Eve-ng using different cisco IOS version and achieve similar results.
Lab Topology
We are using a linear chain — four routers in a row. Source on one end, receiver on the other. This lets us see the flood propagate step by step & the prune messages travel back.
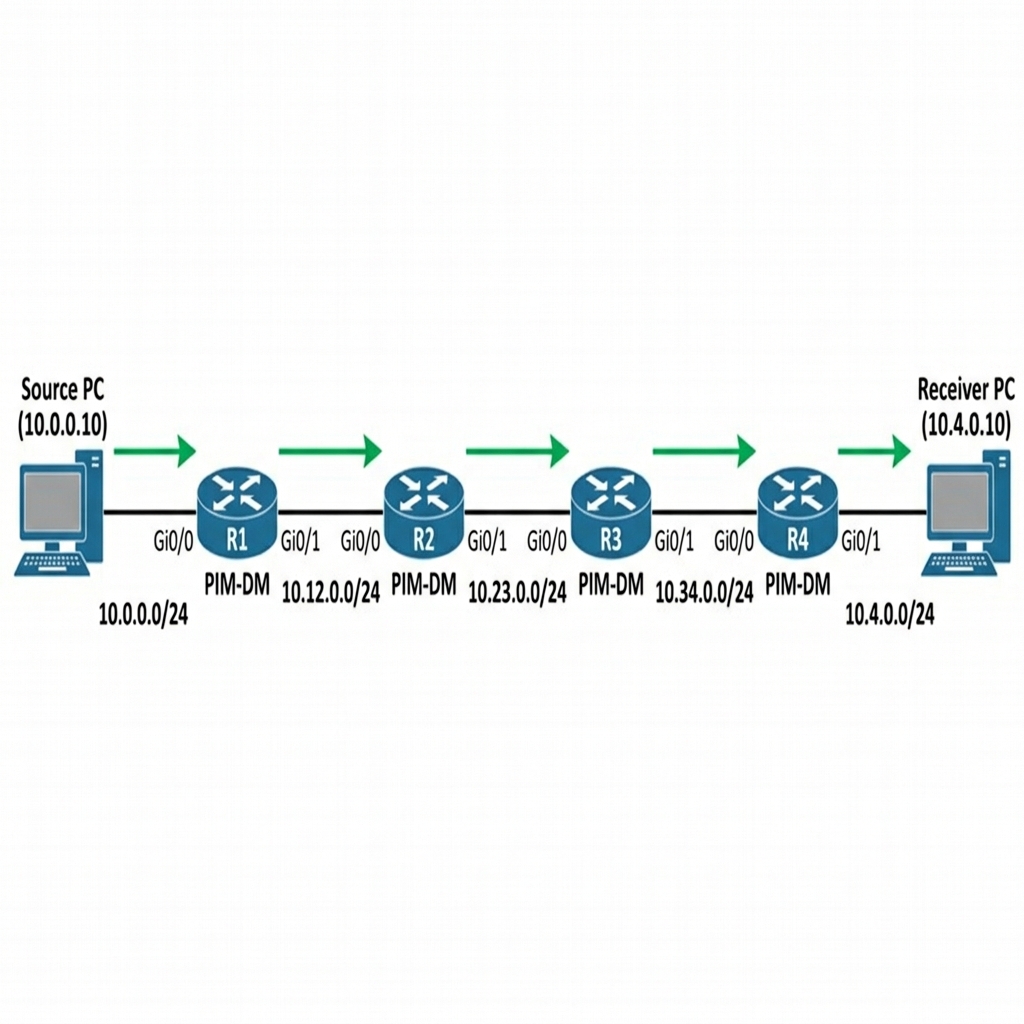
IP Addressing Table
| Device | Interface | IP Address | Subnet Mask | Description |
|---|---|---|---|---|
| R1 | Gi0/0 | 10.0.0.1 | 255.255.255.0 | To Source |
| R1 | Gi0/1 | 10.12.0.1 | 255.255.255.0 | To R2 |
| R2 | Gi0/0 | 10.12.0.2 | 255.255.255.0 | To R1 |
| R2 | Gi0/1 | 10.23.0.2 | 255.255.255.0 | To R3 |
| R3 | Gi0/0 | 10.23.0.3 | 255.255.255.0 | To R2 |
| R3 | Gi0/1 | 10.34.0.3 | 255.255.255.0 | To R4 |
| R4 | Gi0/0 | 10.34.0.4 | 255.255.255.0 | To R3 |
| R4 | Gi0/1 | 10.4.0.1 | 255.255.255.0 | To Receiver |
| Source | Gi0/0 | 10.0.0.10 | 255.255.255.0 | Multicast Source |
| Receiver | Gi0/0 | 10.4.0.10 | 255.255.255.0 | Multicast Receiver |
Step 1 — Base Configuration (OSPF + PIM Dense Mode)
The big difference from previous articles: we are using ip pim dense-mode instead of sparse-mode, & there is no RP configuration. Dense Mode does not need an RP — that is one of its primary characteristics.
R1 Configuration:
hostname R1
!
!! Gi0/0 faces the Source — traffic arrives here
!! 'ip pim dense-mode' is the key difference from Sparse Mode.
!! Dense Mode tells the router: "flood all multicast traffic out
!! every PIM-enabled interface immediately, without waiting for
!! any receiver to ask for it. Let downstream routers prune if
!! they do not want it."
interface GigabitEthernet0/0
 ip address 10.0.0.1 255.255.255.0
 ip pim dense-mode
 no shutdown
!
!! Gi0/1 is the downstream link — traffic gets flooded here
!! even if nobody on R2's side has joined the group
interface GigabitEthernet0/1
 ip address 10.12.0.1 255.255.255.0
 ip pim dense-mode
 no shutdown
!
!! OSPF is still required — PIM Dense Mode uses the unicast
!! routing table for RPF checks (just like Sparse Mode does)
router ospf 1
 network 10.0.0.0 0.0.0.255 area 0
 network 10.12.0.0 0.0.0.255 area 0
!
!! Notice: NO 'ip pim rp-address' command anywhere
!! Dense Mode does not use an RP — there is no shared tree,
!! only source trees built by flooding & pruning
ip multicast-routing
R2 Configuration:
hostname R2
!
interface GigabitEthernet0/0
 ip address 10.12.0.2 255.255.255.0
 ip pim dense-mode
 no shutdown
!
interface GigabitEthernet0/1
 ip address 10.23.0.2 255.255.255.0
 ip pim dense-mode
 no shutdown
!
router ospf 1
 network 10.12.0.0 0.0.0.255 area 0
 network 10.23.0.0 0.0.0.255 area 0
!
ip multicast-routing
R3 Configuration:
hostname R3
!
interface GigabitEthernet0/0
 ip address 10.23.0.3 255.255.255.0
 ip pim dense-mode
 no shutdown
!
interface GigabitEthernet0/1
 ip address 10.34.0.3 255.255.255.0
 ip pim dense-mode
 no shutdown
!
router ospf 1
 network 10.23.0.0 0.0.0.255 area 0
 network 10.34.0.0 0.0.0.255 area 0
!
ip multicast-routing
R4 Configuration:
hostname R4
!
!! Gi0/0 is the upstream interface — receives flooded traffic from R3
interface GigabitEthernet0/0
 ip address 10.34.0.4 255.255.255.0
 ip pim dense-mode
 no shutdown
!
!! Gi0/1 faces the Receiver host — if an IGMP group membership
!! exists on this interface, R4 keeps forwarding traffic here.
!! If no receiver is present, R4 sends a PIM Prune upstream
!! telling R3 to stop sending traffic for that (S,G) pair.
interface GigabitEthernet0/1
 ip address 10.4.0.1 255.255.255.0
 ip pim dense-mode
 no shutdown
!
ip multicast-routing
Source & Receiver Configuration (Cisco Routers):
We configure these as end hosts.
!! Source config
hostname Source
no ip routing
interface GigabitEthernet0/0
 ip address 10.0.0.10 255.255.255.0
 no shutdown
ip default-gateway 10.0.0.1

!! Receiver config
hostname Receiver
no ip routing
interface GigabitEthernet0/0
 ip address 10.4.0.10 255.255.255.0
 no shutdown
ip default-gateway 10.4.0.1
Verify PIM neighbors:
R2# show ip pim neighbor
Output:
PIM Neighbor Table
Neighbor          Interface                Uptime/Expires    Ver   DR
Address                                                            Priority/Mode
10.12.0.1         GigabitEthernet0/0       00:02:15/00:01:30 v2    1 / DR S P G
10.23.0.3         GigabitEthernet0/1       00:02:10/00:01:28 v2    1 / S P G
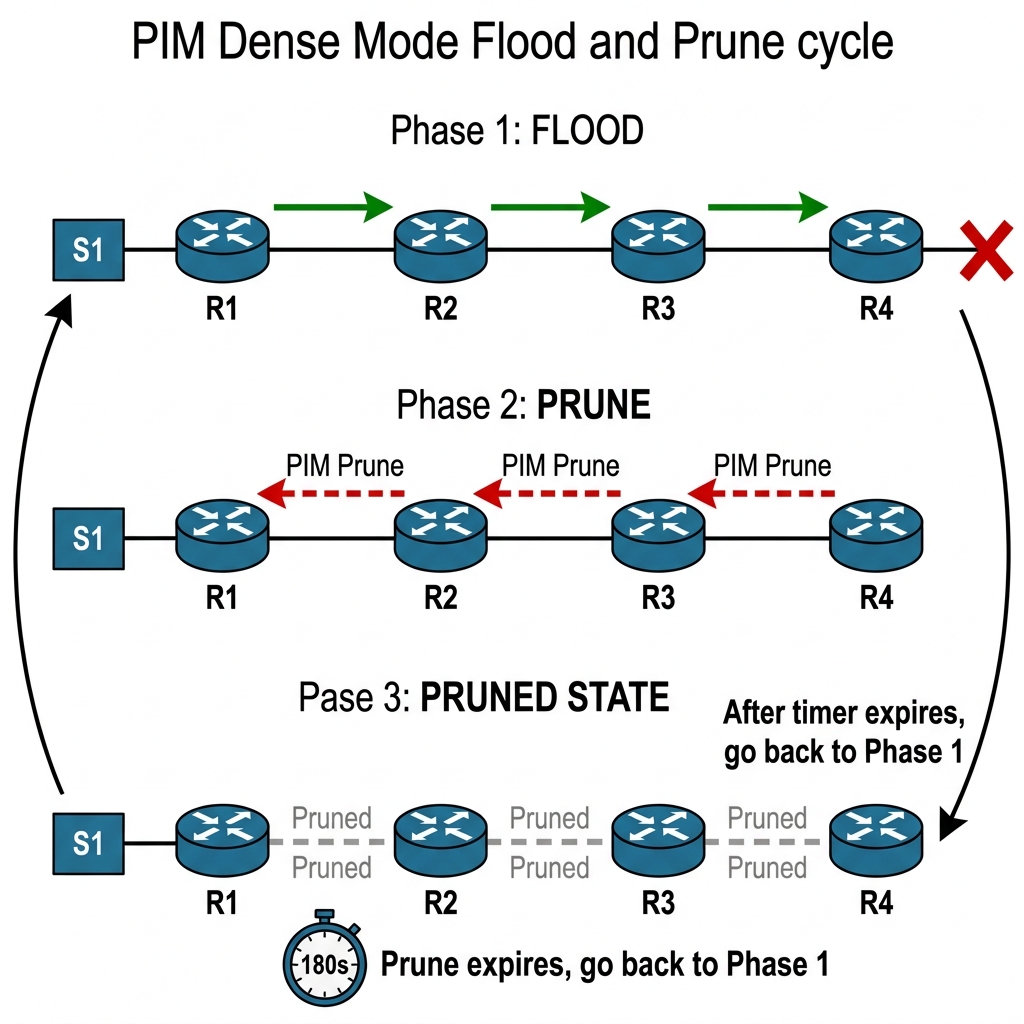
The Theory: PIM Dense Mode uses a “Push” model. It assumes that every branch of the network wants the multicast traffic. As soon as a source starts sending, the first router (R1) floods the traffic out every PIM-enabled interface. This continues until a router realizes it has no active receivers AND no downstream PIM neighbors who want the traffic. Only then does it send a “Prune” message.
Before we add any receiver, let us start sending multicast traffic using a continuous ping from our Source router.
!! On Source — send multicast to 239.1.1.1
Source# ping 239.1.1.1 repeat 1000000 size 1000
Now immediately check the mroute table on every router. Start with R1:
R1# show ip mroute 239.1.1.1
Output:
(10.0.0.10, 239.1.1.1), 00:00:05/00:02:55, flags: DT
  Incoming interface: GigabitEthernet0/0, RPF nbr 0.0.0.0
  Outgoing interface list:
    GigabitEthernet0/1, Forward/Dense, 00:00:05/stopped
Notice the “D” flag — Dense Mode. R1 received multicast traffic on Gi0/0 & immediately forwarded it out Gi0/1 toward R2. No RP involved, no join required. This is the flood behavior.
R2# show ip mroute 239.1.1.1
Output:
(10.0.0.10, 239.1.1.1), 00:00:05/00:02:55, flags: DT
  Incoming interface: GigabitEthernet0/0, RPF nbr 10.12.0.1
  Outgoing interface list:
    GigabitEthernet0/1, Forward/Dense, 00:00:05/stopped
R2 also floods it downstream. Check R3:
R3# show ip mroute 239.1.1.1
Output:
(10.0.0.10, 239.1.1.1), 00:00:05/00:02:55, flags: DT
  Incoming interface: GigabitEthernet0/0, RPF nbr 10.23.0.2
  Outgoing interface list:
    GigabitEthernet0/1, Forward/Dense, 00:00:05/stopped
And R4:
R4# show ip mroute 239.1.1.1
Output:
(10.0.0.10, 239.1.1.1), 00:00:05/00:02:55, flags: DT
  Incoming interface: GigabitEthernet0/0, RPF nbr 10.34.0.3
  Outgoing interface list:
    GigabitEthernet0/1, Forward/Dense, 00:00:05/stopped
Every single router in the chain is forwarding multicast traffic, even though there is NOT A SINGLE RECEIVER anywhere. This is the fundamental problem with Dense Mode — it assumes everyone wants the traffic until proven otherwise.
Step 3 — Watch the Prune
Wait about 3 minutes. R4 has no receiver on Gi0/1 (no IGMP group membership), so it sends a PIM Prune message back toward R3.
Enable debug on R3 to see it:
R3# debug ip pim
Output (after a few seconds):
*Apr 19 01:10:08.100: PIM(0): Received v2 Prune on GigabitEthernet0/1 from 10.34.0.4
*Apr 19 01:10:08.101: PIM(0): Prune (10.0.0.10/32, 239.1.1.1) from GigabitEthernet0/1
*Apr 19 01:10:08.102: PIM(0): Removing GigabitEthernet0/1 from (10.0.0.10, 239.1.1.1) olist
R4 told R3: “I do not want traffic for (10.0.0.10, 239.1.1.1), prune me.” Now check R3’s mroute:
R3# show ip mroute 239.1.1.1
Output:
(10.0.0.10, 239.1.1.1), 00:00:30/00:02:30, flags: DPT
  Incoming interface: GigabitEthernet0/0, RPF nbr 10.23.0.2
  Outgoing interface list:
    GigabitEthernet0/1, Prune/Dense, 00:00:05/00:02:55
Notice the “P” flag — Pruned. R3’s outgoing interface list now shows Gi0/1 as Pruned. R3 is no longer forwarding traffic downstream. But R3 itself has no receiver either, so it sends its own Prune back to R2. This cascading prune continues all the way back to R1.
After all prunes propagate:
R1# show ip mroute 239.1.1.1
Output:
(10.0.0.10, 239.1.1.1), 00:01:00/00:02:00, flags: DPT
  Incoming interface: GigabitEthernet0/0, RPF nbr 0.0.0.0
  Outgoing interface list:
    GigabitEthernet0/1, Prune/Dense, 00:00:30/00:02:30
The entire tree is pruned. R1 is still receiving multicast from the Source, but it is not forwarding it anywhere.
Step 4 — The Prune Timer Expiry (The Annoying Part)
Here is the problem. The prune has a timer — by default, 3 minutes (180 seconds). When that timer expires, the prune is removed & the router starts flooding again. Then the downstream router has to prune again. This creates a periodic flood-prune cycle that wastes bandwidth every 3 minutes.
Wait for the prune timer on R1 to expire:
R1# show ip mroute 239.1.1.1
Output (after ~3 minutes):
(10.0.0.10, 239.1.1.1), 00:04:10/00:02:50, flags: DT
  Incoming interface: GigabitEthernet0/0, RPF nbr 0.0.0.0
  Outgoing interface list:
    GigabitEthernet0/1, Forward/Dense, 00:00:03/stopped
The prune expired, & R1 is flooding again. R2 will flood to R3, R3 will flood to R4, R4 will prune, R3 will prune, R2 will prune, & the cycle repeats. Every 3 minutes. Forever. With traffic eating bandwidth on every link for those few seconds of flooding.
In a network with 50 routers & no receivers, this means every router in the domain gets hit with a burst of multicast traffic every 3 minutes. In a large ISP network, this is completely unacceptable.
The Theory: What if a receiver suddenly appears after a branch has been pruned? The router could wait for the next flood-prune cycle (3 minutes), but that’s a terrible user experience. Instead, Dense Mode uses Graft messages. A Graft is basically a “Wait, I changed my mind!” message that immediately re-enables a pruned branch.
Now let us add a receiver on our Receiver router & see the Graft mechanism in action.
!! On Receiver — join group 239.1.1.1
Receiver(config)# interface GigabitEthernet0/0
Receiver(config-if)# ip igmp join-group 239.1.1.1

R4 receives the IGMP Report from the Receiver & needs traffic immediately. But Gi0/0 was pruned — R3 is not sending anything. Instead of waiting for the prune timer to expire (up to 3 minutes), R4 sends a PIM Graft message upstream.
R3# debug ip pim
Output:*Apr 19 01:15:32.100: PIM(0): Received v2 Graft on GigabitEthernet0/1 from 10.34.0.4
*Apr 19 01:15:32.101: PIM(0): Graft (10.0.0.10/32, 239.1.1.1) from GigabitEthernet0/1
*Apr 19 01:15:32.102: PIM(0): Send v2 Graft-Ack on GigabitEthernet0/1 to 10.34.0.4
*Apr 19 01:15:32.103: PIM(0): Adding GigabitEthernet0/1 to (10.0.0.10, 239.1.1.1) olist
*Apr 19 01:15:32.104: PIM(0): Send v2 Graft on GigabitEthernet0/0 to 10.23.0.2
The Graft is a reliable message — R3 acknowledged it with a Graft-Ack & immediately started forwarding traffic again out Gi0/1. R3 then sent its own Graft upstream to R2, which propagated to R1. Within milliseconds, the entire tree is rebuilt.
R4# show ip mroute 239.1.1.1
Output:
(10.0.0.10, 239.1.1.1), 00:05:00/00:02:55, flags: DCT
  Incoming interface: GigabitEthernet0/0, RPF nbr 10.34.0.3
  Outgoing interface list:
    GigabitEthernet0/1, Forward/Dense, 00:00:10/stopped
The “C” flag means Connected — there is a directly connected receiver. Traffic is flowing.
Step 6 — Remove the Receiver & Watch Prune Again
!! On Receiver — leave the group
Receiver(config)# interface GigabitEthernet0/0
Receiver(config-if)# no ip igmp join-group 239.1.1.1
After the IGMP Leave & Group-Specific Query timeout, R4 sends a Prune again & the tree collapses. The cycle continues.
Step 7 — PIM Dense Mode State Refresh
Cisco implemented an optimization called State Refresh to reduce the periodic flood-prune cycle. The source’s first-hop router periodically sends State Refresh messages that refresh the prune state without requiring a full flood cycle.
!! Check if State Refresh is enabled (it is by default on IOSv)
R1# show ip pim interface GigabitEthernet0/1 detail | include State
Output:
State-Refresh processing is enabled
With State Refresh, the flood-prune cycle still exists logically, but the “flood” part is skipped because the prune state is refreshed before it expires. This helps, but it does not solve the fundamental inefficiency of Dense Mode’s “push” model.
Break It — Create a Routing Loop
Dense Mode is particularly dangerous when routing loops exist. Let us create one & see what happens.
I am going to add a direct link between R1 & R4, creating a loop: R1→R2→R3→R4→R1.
!! On R1 — add a link to R4
R1(config)# interface GigabitEthernet0/2
R1(config-if)# ip address 10.14.0.1 255.255.255.0
R1(config-if)# ip pim dense-mode
R1(config-if)# no shutdown

!! On R4 — add a link to R1
R4(config)# interface GigabitEthernet0/2
R4(config-if)# ip address 10.14.0.4 255.255.255.0
R4(config-if)# ip pim dense-mode
R4(config-if)# no shutdown

!! Add OSPF on both
R1(config)# router ospf 1
R1(config-router)# network 10.14.0.0 0.0.0.255 area 0

R4(config)# router ospf 1
R4(config-router)# network 10.14.0.0 0.0.0.255 area 0
Now start multicast traffic from the Source & check what happens:
R4# show ip mroute 239.1.1.1
Output:
(10.0.0.10, 239.1.1.1), 00:00:10/00:02:50, flags: DT
  Incoming interface: GigabitEthernet0/0, RPF nbr 10.34.0.3
  Outgoing interface list:
    GigabitEthernet0/1, Forward/Dense, 00:00:10/stopped
    GigabitEthernet0/2, Forward/Dense, 00:00:10/stopped
R4 is forwarding multicast back toward R1 on Gi0/2. But R1 is the source-side router — it should not be receiving multicast from R4. Let us check R1:
R1# show ip mroute 239.1.1.1
Output:
(10.0.0.10, 239.1.1.1), 00:00:15/00:02:45, flags: DT
  Incoming interface: GigabitEthernet0/0, RPF nbr 0.0.0.0
  Outgoing interface list:
    GigabitEthernet0/1, Forward/Dense, 00:00:15/stopped
    GigabitEthernet0/2, Prune/Dense, 00:00:03/00:02:57
R1 received multicast on Gi0/2 from R4, but it failed the RPF check (the source 10.0.0.10 is on Gi0/0, not Gi0/2), so R1 drops those packets & prunes Gi0/2. The RPF check saved us from a loop here. But during those initial seconds of the flood phase, duplicate packets traveled the long way around the network. In Dense Mode with complex topologies, this brief duplication happens every prune cycle.
Clean up:
R1(config)# interface GigabitEthernet0/2
R1(config-if)# shutdown

R4(config)# interface GigabitEthernet0/2
R4(config-if)# shutdown
When Does Dense Mode Actually Make Sense?
In real-world networks, Dense Mode is used in exactly two scenarios:
- Auto-RP bootstrap — When you use Auto-RP, the RP discovery messages (224.0.1.39 & 224.0.1.40) need to flood everywhere using Dense Mode because the RP is not known yet. This is the
ip pim sparse-dense-modeuse case. - Very small, closed networks — If you have a tiny cluster of 3-4 devices where every device is a receiver (like a small render farm), Dense Mode avoids RP overhead. But even then, most architects just use PIM-SM with a static RP.
In every other case, use PIM Sparse Mode. Dense Mode’s flood-and-prune behavior does not scale & wastes bandwidth on every link in your network.
Dense Mode vs Sparse Mode Summary
| Characteristic | PIM Dense Mode | PIM Sparse Mode |
|---|---|---|
| Traffic Flow Model | Push (flood first) | Pull (join first) |
| RP Required | No | Yes |
| Scalability | Poor | Good |
| Bandwidth Usage | Wastes bandwidth during flood | Only uses bandwidth where receivers exist |
| Prune Timer | 180 seconds (periodic re-flood) | N/A |
| Graft Mechanism | Yes (for quick rejoin) | N/A (uses PIM Join) |
| Real-World Usage | Nearly extinct | Universal standard |
Key Takeaways
- Dense Mode floods multicast everywhere first & waits for routers to prune branches with no receivers
- The prune timer (180s) causes periodic re-flooding wasteful & dangerous at scale
- Graft messages are used for immediate rejoins without waiting for the prune timer
- RPF checks are what prevent multicast loops in Dense Mode without them, the network would melt
- Dense Mode does not need an RP this is its only real advantage over Sparse Mode
- Nobody uses Dense Mode in production except for Auto-RP discovery messages
- Understanding Dense Mode is critical for understanding why Sparse Mode was designed the way it was